Tigraine

Daniel Hoelbling-Inzko talks about programming

You have to know English to be a Programmer!

Scott Hanselman just blogged this interesting letter from Fabrice Fonck on Microsoft’s effort to localize Visual Studio and .NET entitled Do you have to know English to be a Programmer? and I wanted to share my thoughts on this as a non-native speaker:

As most of you may know, I am from Austria – so my native tongue is German. There should be about 100 million people speaking that language and so it’s rather natural that there are many sites discussing programming topics in German and also there are many books that get translated. So, while I know that you could be a rather successful programmer in Germany/Austria without English, I really believe it’s utterly impossible to be a good programmer without being fluent in English!

Why? Simply, because being a good programmer is not about knowledge, ability or technology but about your ability to acquire even more knowledge and constantly improve and refine your skills.

And you really can’t do that if deny yourself access to 90% of the internet’s resources. You’ll miss out on great articles from people like Scott Hanselman, Ayende Rahien, Miško Hevery, Rob Conery, Carl Senguin and many more who have contributed great articles that have influenced my skill directly.

Not accepting that English is the predominant language in software development only fragments the community and hinders sharing of knowledge.

And to be honest, all our programming languages are based on the English syntax, so I can’t think about a way for somebody with no English skills to write code against the .NET framework anyway. The code we produce is in English and defines it’s context/meaning/purpose through naming. Not being able to understand the meaning of System.Net.MailMessage.To is a serious problem when trying to write software (when not copying snippets and samples).

One thing remains to be said: When writing code I constantly encounter one problem: German speaking customers vs English speaking code. Naming my objects in German doesn't work for me, it starts to feel wrong if you mix two languages (English syntax and German variables), so I translate the German requirements and object names to English ones.

This makes it sometimes difficult to talk to the the customer during development, because I use words he doesn’t know and I constantly have to map his words to mine. This isn’t so much of a problem as long as you as a developer don’t mix things up and choose your translations right. Still it annoys a bit and I would be thankful for a English customer once in a while :).

Finally: I switched my blog to English almost a year ago because I felt that blogging in German created a barrier for me. I couldn’t point anyone outside Austria/Germany to my writings. And while many people since have asked my why I neglect German (mostly out of curiosity), I can’t say I have ever regretted this move (and my English did benefit from this).

Patience is a virtue I don’t have

I hate waiting for stuff when working. Whenever something hangs, lags or simply doesn’t work right the first time I get annoyed.

Usually a little distraction like this doesn’t really hurt too much, but when you are deep in thought while programming – and something hangs, I can almost feel how my memory gets flushed and my productivity drops to zero for the next few minutes while I try to get back into everything.

This is very very very bad, and that’s why I am feeding insane amounts of money to the hardware vendors. I need the best performance not because of the insane calculations I do but simply because I can’t afford to get distracted by lagging applications.

Same thing applies to unit tests and build processes. It’s important to keep those as short as possible. If I’m doomed to wait for 2 minutes to see if my unit tests pass or not I will either not run them as frequently, or I will run them and do something else in between. Either way I loose productivity.

So, while at it, I guess the server I wanted to configure stopped hanging while I wrote this.

One thing I miss from the VB6 days

Ok, now I’m doomed. That headline alone should be enought for a death sentence. But still – there was one thing in the visual designer I liked:

Back in the day you could give two labels the same name and then assign them an Index property. The designer then would generate a array of labels with the given indexes. In Visual Studio 200X, this is not possible without altering the designer.cs file and that then leads to problems when changing the form.

I just encountered this because I have some status labels for some kind of wizard interface. One of them has to be bold, the others shouldn’t. And the most natural way to do that would be to simply have them in an array or list of some sort and loop over them changing their font values.

Anyway, guess I’ll be adding the designer created labels to a list and iterating over that.

Filed under net, programmierung

Windows Forms: Form within a panel

I already blogged about Visual Inheritance as a tool for avoiding DRY violation.

Once you’re through with any better book on object oriented design you should have found another important oo principle:

Favor object composition over class inheritance

But how to do that in Windows Forms?
Well, if you dig with Reflector into the Form class you’ll discover that it’s derived from Control. And every container in Winforms accepts Control as it’s child objects.

image

Now, this makes it possible to just create a Panel and say:

panel1.Controls.Add(form);

But after running you’ll get a ArgumentException stating that you can’t add a top level control at this level.

The solution to this is even simpler, you simply need to tell the form to not be top level any more:

form.TopLevel = false;

And you’re done, you just need to set the BorderStyle on your form to get rid of the ugly borders and you’ve successfully embedded a form into another form.

The complete example looks like this:

Form1 form = new Form1();
form.TopLevel = false;
panel1.Controls.Add(form);
form.Show();

Conditional breakpoints in Visual Studio

Sometimes you do something and you never really think about what you’re doing.
Like the following code:

public bool TestSomething(bool input)
{
    if (input == true)
    {
        return true;
    }
    else
    {
        return false;
    }
}

It’s so obvious, I never thought about what I was really doing there, let alone seen the mistake I made. I mean, without any knowledge about boolean evaluation you still should figure out how to get rid of the bracket porn and produce something like this:

public bool TestSomething(bool input)
{
    if (input == true)
        return true;
    return false;
}

But that’s only syntactic, the whole statement itself is still silly. The whole == true is completely redundant because you already check a boolean condition to evaluate it to a boolean.


So it boils down to:

public bool TestSomething(bool input)
{
    return input;
}

And that’s it. You just saved yourself 6 lines of code that where completely useless (and I guess the compiler is smart enough to optimize that anyway  Update: actually, this does make a difference. The compiler can’t figure this out and will produce more IL code because of this).

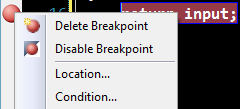
But once I did this I felt I lack the ability to put a breakpoint on the return false statement. And I eventually may have thought about going back to solution #2. But then I found this little thing in Visual Studio that made my day (and all major IDEs have that, only they hide it well):

image

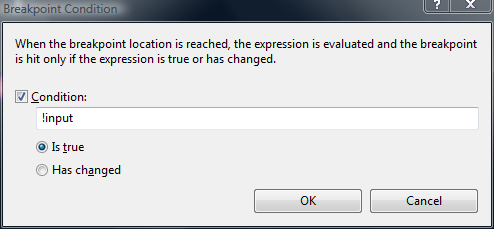
When you right click a breakpoint you can add a Condition to it, so it will only break when that condition is met. I did so, and voila:

image

Without having to degrade my code I still could break only when false was returned.
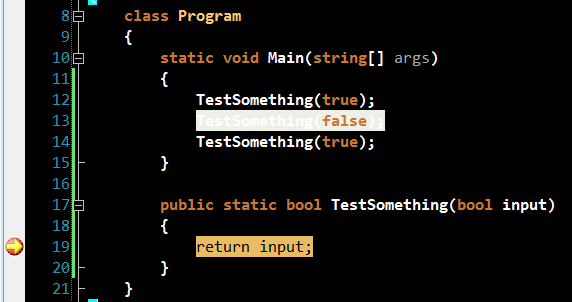
So when I ran it the first break was in the third call:

image

So, thank god for such great tools like Visual Studio and ReSharper (R# hinted to me that I was doing something stupid in the first place)!

Filed under net, programmierung, tools

Cheap Bugtracking systems

I don’t like documentation.
Whenever I feel that I need to add comments to a piece of code to make it understandable I usually rework the code until it’s intent and workings are clear from looking at it.

Still, documentation will come after you once you are dealing with defects and planned features. Nobody can keep that stuff in their head, and it’s important to keep track of what your customers expect you to do/fix.

And while big projects demand some “real” process around this issue, when you’re doing small projects you usually don’t want to break a butterfly upon a wheel.

One easy solution is to simply write a Unit Test that exposes the bug.
Whether you fix it right away or you check it into your source-tree is totally up to you, but you’ll always see that red light reminding you of that bug.

While at it, I strongly suggest always writing a Unit Test to expose a bug prior to fixing it. You increase your code coverage by fixing bugs, and protect yourself from having the bug surface again with a later change.

Still, you should also look into getting a “real” bugtracking databases like FogBugz (has a free 2 person license), or install your own like Trac or BugNET.

Filed under programmierung, testing

Virtual member call in constructor and NHibernate

As you may have noticed, I’ve been doing some NHibernate work lately and really had a great time with this absolutely amazing ORM. Especially now that Microsoft abandoned Linq to SQL I really feel good about having made the step towards NHibernate.

Yesterday was one of those tricky days when something breaks and you have no clue why.

I have a table called “Orders” and there are “OrderItems”.

image

By writing the tests upfront, I found out that I’d like to be able to just say Repository.Add(Order) instead of persisting the Order and afterwards looping through the OrderItems and persisting them too.

To achieve this I changed the mapping to something like this:

<set name="OrderItems" cascade="all">
  <key column="OrderId" />
  <one-to-many class="OrderItem"/>
</set>

The cascade=all statement is what I searched for initially. When the order gets persisted, all OrderItems in the collection get persisted too, and everything is well.

But, since my POCO object looks like this:

public class Order
{
    public virtual long Id { get; set; }
    public virtual ISet<OrderItem> OrderItems { get; set; }
}

I got NullReferenceException whenever I tried to access OrderItems on new Order objects. And I thought, hey.. kinda sucks newing up the collection in my business layer, why not init it in it’s constructor:

    public Order()
    {
        OrderItems = new HashedSet<OrderItem>();
    }

So I could just do Order.OrderItems.Add(OrderItem) without having to instantiate a HashedSet anywhere.
I got a bit cautious when Visual Studio underlined OrderItems and made the cryptic announcement: “Virtual member call in constructor”.


Totally unaware of what this means, I just went on and ran my tests.

Imagine my face when almost all my tests failed due to an omnious nHibernateException:

NHibernate.HibernateException: Illegal attempt to associate a collection with two open sessions

I didn’t figure this out until today, but it had to do with the “Virtual member call in constructor” warning. I discovered this post by Brad Abrams that explains the topic.

Looks like if you set the collection in the constructor of the POCO object NHibernate will break with the above Exception.
Solution to avoid this? Init the collection from calling-code instead of within the object.

What would have helped the issue would be to not have concrete POCO objects but rather use interfaces instead of virtual members (Read Fabio Maulo’s post entity-name in action: Entity Abstraction on that topic).

Unit testing with mocks &ndash; Rhino Mocks basics (Part 2)

In Part1 of this series I have showed you how to create a very simple mock object by hand. In this post I will show you how to use RhinoMocks to create the mock and how to verify this. This post is intended as basic advice, and won’t cover any advanced RhinoMocks topics, just the basic setup/replay/verify steps.

When working with almost any mock framework there are 3 things: Setup, expectation recording and verifying that the expectations where met.
That means, first you tell the mock object what calls to expect. Then you let the method under test do it’s magic and afterwards you let the mock verify that all expected calls where made.
You can get very precise on what to expect and how to expect it, but that will be covered in the next part of this series.

The hand-made mock from Part1 would translate to a test like this when using RhinoMocks:

[Test]
public void ServiceWatcherNotifiesUser()
{
    var repository = new MockRepository();
    var notifier = repository.StrictMock<IErrorNotifier>();

    notifier.NotifyOfServiceDown();

    repository.ReplayAll();

    var watcher = new HttpServiceWatcher(notifier);     watcher.ObserveService();

    repository.VerifyAll(); }

The main things here:
We start the repository and then request a IErrorNotifier object from it.

var repository = new MockRepository();
var notifier = repository.StrictMock<IErrorNotifier>();

The mock object (notifier) is in record mode now, all calls we do to the object aren’t actually executed but will be expected afterwards.
So if we want NotifyOfServiceDown to be called once we simply call it while in record mode:

notifier.NotifyOfServiceDown();

After having set up all expectations in record mode, we tell the Mockrepository to go to replay mode:

repository.ReplayAll();

The mock object still doesn’t do anything. But it expects what we setup in replay. If the watcher calls methods that weren’t specified in replay mode the mock will throw exceptions at us.

Now we construct the object under test:

var watcher = new HttpServiceWatcher(notifier);

And note that we pass the mock object instead of an actual implementation of IErrorNotifier.
Now we call the method under test just as we would normally:

watcher.ObserveService();

That leaves us with only one step left, we tell the repository to verify all mocks that where created and it will throw Exceptions if mocks didn’t get called or did get called too often.

repository.VerifyAll();

Although this is just a very basic example of how to use RhinoMocks, you are able to see the benefits from this. You could write the HttpServiceWatcher class without having to write any concrete IErrorNotifier implementations. You can just concentrate on the HttpServiceWatcher instead of worrying how the underlying Service is going to work.

In the next part I’ll be covering how to make some fancier things with RhinoMocks like returning values and verifying that passed parameters meet certain criteria.

The source code is available through my SVN repository:

svn checkout https://office.pixelpoint.at:8443/svn/tigraine/UnitTesting/trunk UnitTesting –username guest

Notice that all dependencies are also in the svn, so you don’t need to get RhinoMocks or nUnit yourself.

Unit testing with mocks (Part 1)

I regret not having blogged on TDD and designing for test before – it makes it very difficult to talk about mocking as it is a rather advanced topic, requiring at least some knowledge of polymorphism and oo-design.
So this post is the first in a series of posts on the topic of testing with mock objects, that will hopefully help you with your testing.

Testing is one of the most important things in software development.
We’re all human, and we all make mistakes. And even if we discover these mistakes during development and testing, it’s almost certain that we’ll have to come back at a later point to change something, possibly breaking what already worked.
Doing a full QA cycle during initial development may look reasonable to most of us, but doing it every time you change a tiny bit in the application will certainly get you some angry mails from management.
Having good unit tests gives you a safety net for future development. By simply running the tests you can verify that things that already worked still work properly. And that’s what is important in software development.

The whole idea of unit testing is to test as little as possible while still verifying that the method under test behaves as specified and expected.
Keep this in mind, because it is important when testing classes that depend on services or other classes.

If let’s say you have a HttpServiceWatcher that is a service running somewhere and watching if a HttpService is up and running, you should test the HttpServiceWatcher class itself, not the associated notifier classes that the Watcher calls when it wants to notify you.
But how do you verify that the HttpServiceWatcher really worked and called the notifier as a result?

Let’s start with the Notifier interface:

public interface IErrorNotifier
{
    void NotifyOfServiceDown();
}

Let’s assume we have implemented a EmailNotifier class, if the HttpServiceWatcher looks like this we’re in testing-nightmare land:

public class HttpServiceWatcher
{
    public void ObserveService()
    {
        IErrorNotifier notifier = new EmailNotifier();
        notifier.NotifyOfServiceDown();
    }
}

The HttpServiceWatcher news up it’s notifier service, so every time we want to adjust the notifier, we’d have to change the ServiceWatcher and risk breaking something. Also, we can’t test the ServiceWatcher itself, because it will always call to an EmailNotifier that we can’t fake easily.

So, the correct move would be to use Inversion of Control (IoC) to inject the service into the watcher class:

public class HttpServiceWatcher
{
    private IErrorNotifier notifier;

    public HttpServiceWatcher(IErrorNotifier notifier)     {         this.notifier = notifier;     }

    public void ObserveService()     {         notifier.NotifyOfServiceDown();     } }

Now, the HttpServiceWatcher class doesn’t directly depend on any concrete implementation of IErrorNotifier, the calling code takes care of creating the concrete classes. Changes to notifiers don’t get propagated to the HttpServiceWatcher.
Also, this makes it very easy to simply fake the notifier. We could either create a fake test class that inherits IErrorNotifier, or we could use a Mocking framework.

Manual mocking could look like this:

public class NotifierMock : IErrorNotifier
{
    public int notifyOfServiceDownCallCount = 0;

    public void NotifyOfServiceDown()     {         notifyOfServiceDownCallCount++;     } }

The test could then look like this:

[Test]
public void ServiceWatcherNotifiesUser_Custom_Mock()
{
    var notifier = new NotifierMock();

    var watcher = new HttpServiceWatcher(notifier);     watcher.ObserveService();

    Assert.AreEqual(1, notifier.notifyOfServiceDownCallCount); }

And that’s fine. It works, we verify that the watcher actually calls the notifier service, and all is well.
It just gets tricky when you get more tests, you’ll have to create many mock objects that always introduce the possibility of breaking other tests etc.

In the next post in this series I will try to illustrate how to do the same thing with RhinoMocks and how it makes testing very easy.

Download the source code from my SVN Repository by doing a:

svn checkout https://office.pixelpoint.at:8443/svn/tigraine/UnitTesting/trunk UnitTesting –username guest

Continue reading Unit testing with mocks – Rhino Mocks basics (Part 2)

Common gotchas with Inherited Forms

Don’t repeat yourself is one of the most important principles I know of. And there are many ways to follow DRY when it comes to normal code.

But when you go to Winforms-land most people forget about DRY and create the same Gui code over and over again. Some of them are clever and abstract the “handlers” away from the buttons, but they still draw most of the buttons multiple times for forms that look almost exactly the same.

But it’s pretty common to have multiple views of the same forms. Like a CreateNewUser and a UpdateExistingUser mask, they both share almost all textboxes, but their values get processed differently.

You could try to use the same form for both operations, but that violates SRP (and makes things a lot harder), or you have two different forms that inherit the controls from a parent form.

Tha't’s then called Visual Inheritance. And, sadly the Windows Forms designer within Visual Studio is pretty bad at it, it crashed on my multiple times.

After 2 hours of fooling around with the Designer to get my Forms to show again I decided to share my experience, since there are some simple rules that you can follow to not break your design surface:

Don’t remove the default constructor from your parent form

The designer depends on a parameterless constructor, if you want to have parameters create a new constructor (and therefore don’t forget to call InitializeComponent again)

Don’t hook up Form_Load events in your parent form

I sincerely have no clue why this breaks the designer, but it does.


It’s rather tragic that the designer breaks on working code (compiling and running my code always worked, the designer just couldn’t load the form to show the design surface), but if you follow the above guidelines everything should work out fine.

There is also another way to remove code duplication by using Custom Controls and User Controls, these get handled better by the designer, but require a bit more thinking when creating (You may get in trouble when you try to modify their instantiation because that’s done during the InitializeComponent call).

My Photography business

Projects

dynamic css for .NET

Archives

more