#net

Posts tagged net

Windows Live Writer Plugin: Wrap code in <tt>

As of late I try to mark code parts inside normal text with the <tt> tags to make them stand out as code. While writing my MonoRail tutorial yesterday I got really annoyed by switching between source and normal view inside Windows Live writer to add <tt> all over the place, so I figured I’d use the WLW Plugin API to write a plugin that wraps text inside <tt>.

namespace wlwWrapIn
{
    using System;
    using System.Windows.Forms;
    using WindowsLive.Writer.Api;

    [WriterPlugin("37CB2E7F-1809-4344-9527-526768A99E9F", "WrapInTT", PublisherUrl = "http://www.tigraine.at")]     [InsertableContentSource("Wrap in <tt>", MenuText = "Wrap in <tt>", SidebarText = "Wrap in <tt>")]     public class WlwWrapIn : ContentSource     {         public override System.Windows.Forms.DialogResult CreateContent(System.Windows.Forms.IWin32Window dialogOwner, ref string content)         {             content = String.Format("<tt>{0}</tt>", content);             return DialogResult.OK;         }     } }

Oh yeah it is that simple, just reference the WindowsLive.Writer.Api class and you can write a plugin like that.

In case someone needs my <tt> wrapping plugin, you can get it here: WrapInTT.dll

Read more →

Building a databound contact form with MonoRail &ndash; Part 1: Views and Databinding

In this tutorial we will look the steps necessary to create a form with Castle MonoRail that then gets sent off by email. It will touch FormsHelpers, DataBinding and using the EmailTemplateService to style and EmailSender to send a message.

The tutorial will probably be split into three parts:

Views and Databinding

I assume you already have a (maybe blank) MonoRail site running, if not you could check out this changeset on my sample-repository where the MonoRail sample app is still pristine.

1 – Creating the Controller

There are two components to a contact form: The form and the thanks screen.
In MVC speech that means we’ll have one Index action just serving up the view, and one Thanks action doing the email sending / heavy lifting.
Anyway the controller for now looks fairly simple:

public class ContactController : SmartDispatcherController
{
    public void Index()
    {
        
    }
}

2 – Creating the View

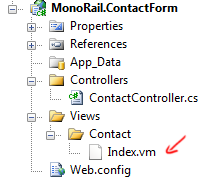
image The usual routine for creating MonoRail NVelocity views applies here. The \Views\<controllername>\<actionname>.vm convention dictates that our View is called “Index.vm” and placed inside the \Views\Contact\ folder

(Btw, you probably want to tell Visual Studio to open .vm files in HTML view with Rightclick .vm file –> Open With –> select HTML Editor –> Hit Set as Default)

Inside the View we need textfields for Name, Email and Subject. And of course one big textarea for the user’s text.

We all know how HTML works: we could go ahead and build a nice accessible form by putting together <input type… tags there and hand-coding everything ourselves. Or we’d just rely on the MonoRail FormsHelper to provide methods to generate the inputs for us:

<form method="post" action="$UrlHelper.For("%{action='Thanks'}")">
<fieldset>
    <legend>Contact Form</legend>
    <ol>
        <li>$FormHelper.LabelFor("FormData.Name", "Name")
        $FormHelper.TextField("FormData.Name")</li>
        <li>$FormHelper.LabelFor("FormData.Email", "Email")
        $FormHelper.TextField("FormData.Email")</li>
        <li>$FormHelper.LabelFor("FormData.Subject", "Subject")
        $FormHelper.TextField("FormData.Subject")</li>
        <li>$FormHelper.LabelFor("FormData.Text", "Message")
        $FormHelper.TextArea("FormData.Text", "%{rows='14', cols='0'}")</li>
    </ol>
    <input type="submit" id="submit" value="Send" />
</fieldset>
</form>

Note the $FormHelper.TextField(“FormData.Name”)call that results in a <input type="text" id="FormData_Name" name="FormData.Name" value="" />. One nice side-effect of using this helper is that it will look at the current request parameters and if a FormData.Email value is set display it as the textfields value.

Also Interesting here is the syntax NVelocity uses to specify Dictionary data inside the view: “%{key=’value’}” specifies a IDictionary that gets passed off to our helpers.

3 – Creating the DTO

A contact-request is a message, so I like to have a data-object to represent that message during processing. This also makes it easier for us to retrieve the inputs sent from the Form (more on that later).
So we create a class called ContactRequest in the Models\ folder that can easily hold our form data:

namespace MonoRail.ContactForm.Models
{
    public class ContactRequest
    {
        public string Name { get; set; }
        public string Email { get; set; }
        public string Subject { get; set; }
        public string Text { get; set; }
    }
}

4 – Databinding the DTO to our Form

You may have noticed that I named all TextFields in step 2 FormData.something where something corresponds to the fields inside the DTO from step 3. FormData is just a arbitrary string to prefix all of my inputs, where the latter will be used by MonoRail’s DataBinder to map the values onto my DTO.


We just need to instruct MonoRail on our action method to bind to all Query parameters starting with FormData and stuff them into our ContactRequest object. Our controller now looks like this:

public class ContactController : SmartDispatcherController
{
    public void Index()
    {
        
    }

    public void Thanks([DataBind("FormData")] ContactRequest request)     {              } }

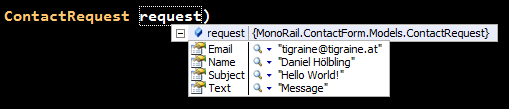
If we debug into this action you can see that the request parameter gets filled by MonoRail with the values from the Query:

image

Since we now have a Thanks action on our Controller we also need to create a Thanks.vm view inside our Views\Contact\ folder. A blank one will do for this tutorial.

Now that we have the form up and bound our DTO to it, we’ll continue in our next tutorial step with rendering and email and sending it.

Read more →

Building a databound contact form with MonoRail &ndash; Part 2: Sending Emails

This is part 2 of a 3 part tutorial on writing a databound contact form with Castle Monorail that gets sent off by email. We already touched FormHelpers and DataBinding in Part1: Views and Databinding, now we’ll see how easy it is to send a email template with MonoRail.

The other parts of this tutorial:

Sending Emails

We left off with a Thanks controller method that gets a ContactRequest parameter and now should send off the data by email.

1 – Configuring our Servers

Anything involving emails usually requires a SMTP server. The same thing goes for MonoRail, yet MR will default the SMTPServer setting to 127.0.0.1 if you don’t explicitly configure it through your web.config. Unfortunately for me I don’t have a SMTP server sitting on my box, so I had to change that setting through the monorail configuration node inside our web.config:

<monorail smtpHost="smtp.server.com">
  <controllers>
	  <assembly>MonoRail.ContactForm</assembly>
  </controllers>
  .
  .

You can optionally also optionally configure smtpPort, smtpUsername and smtpPassword.

2 – Sending a sample Message

We’ll jump ahead a bit and send a email message right away to verify that our settings so far have been working. Sending emails is as simple as calling the DeliverEmail method from within our Thanks controller action:

public void Thanks([DataBind("FormData")] ContactRequest request)
{
    var message = new Message
                      {
                          To = "[email protected]",
                          From = "[email protected]",
                          Subject = "Hello World",
                          Body = "My first message"
                      };
    DeliverEmail(message);
}

It’s really that easy.

3 – Templating the Message

It’s simple to send emails as seen in step 2, but having to chop strings together to send emails is just awful and error prone. Especially when you want some fancy HTML layout in your emails you’ll want to leverage the power of your ViewEngine to create the email message.

MonoRail provides such a method with it’s RenderMailMessage method. RenderMailMessage takes in a viewname, a layout and a IDictionary of parameters that will get passed on to the view.


For this simple tutorial I chose not to use a layout, so I pass in null. Also make sure you cast your Dictionary to the non-generic IDictionary since there is a little bug with the generic IDictionary overload.

public void Thanks([DataBind("FormData")] ContactRequest request)
{
    var parameters = new Dictionary<string, object>{{"request", request}};
    var message = RenderMailMessage("contact", null, (IDictionary)parameters);
    DeliverEmail(message);
}

MonoRail will look for email-templates inside the Views\mail\ folder, so we’ll add our contact.vm there:
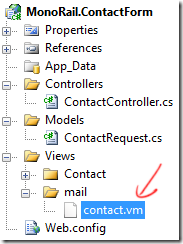
image One thing you’ll notice immediately is that all information about from, to, subject and body have not disappeared from our action method. This data will now get extracted from the view, allowing for easy customization.

To do so we need our view to look like this:

to: [email protected]
from: $request.Email
subject: $request.Subject

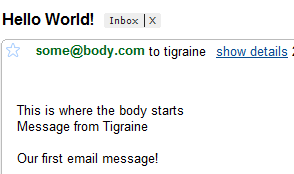
This is where the body starts Message from $request.Name

$request.Text

MonoRail will extract the information from the to: from: fields and use them to send the message. The above also uses the parameters we passed in to render. $request here refers to the object passed into our dictionary with name request.

If run we’ll end up with a email simiar to this:
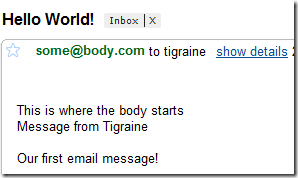
image

4 – Testing it

Email interactions are perfect examples of stuff that goes wrong without anyone noticing. Someone does some changes in the controller and all of a sudden you don’t get those annoying contact requests for a week. Usually you blame it on a slow week and by the time you suspect something is wrong you already ignored a month of customer feedback.

To avoid this we’ll want to unit test this, and while I usually write my tests first – it’s easier to follow if you know the code under test. Testing in MonoRail is quite simple once you know where to look, unfortunately the documentation is scattered and scarce.

We’ll begin by making our testclass derive from BaseControllerTest, a class inside the Castle.MonoRail.TestSupport assembly that is used to facilitate testing.

public class ContactBehaviorTest : BaseControllerTest
{
    
}

This provides us with a neat little function that allows us to sandbox our controller called PrepareController.

Testing that a message has been rendered through the template engine would therefore look like this:

[Fact]
public void Thanks_RendersTemplatedEmail()
{
    var controller = new ContactController();
    PrepareController(controller);

    controller.Thanks(null);

    Assert.True(HasRenderedEmailTemplateNamed("contact")); }

This test merely verifies that a template was rendered, but we probably want to verify that the view gets passed the correct arguments:

[Fact]
public void Thanks_MailRendering_ParametersGetPassed()
{
    var controller = new ContactController();
    PrepareController(controller);

    var request = new ContactRequest();     controller.Thanks(request);

    var parameters = RenderedEmailTemplates[0].Parameters["request"];     Assert.Same(request, parameters); }

We now have verified that the “request” parameter object is indeed the one passed into the action method. This is not perfect since we’d just want to verify that the correct values get passed around, not references. But for this tutorial this will suffice.

Next on our checklist should be the fact that the created message is indeed sent off. We do so by using the StubEngineContext our BaseControllerTest provides us with:

[Fact]
public void Thanks_EmailSending_SendsOutOneEmail()
{
    var controller = new ContactController();
    PrepareController(controller);
    var context = (StubEngineContext)Context;

    controller.Thanks(new ContactRequest());

    Assert.Equal(1, context.MessagesSent.Count); }

This now simply verifies that we did indeed send a mail message.

Now we have a fully working contact form that gets sent off by email through a template. We may want to protect that form from bad input by validating some of our fields. Check back tomorrow for part 3 of this tutorial.

Ps: As always the source for this tutorial is available in my BitBucket samples repository. Usually one changeset represents one tutorial step.
Read more →

ActiveRecord gotchas when testing with an in memory database.

If the title sounds familiar to you, it’s intentional. After having to deal with this in pure NHibernate it came around to also bite me with ActiveRecord.

In short: in-memory SQLite will drop the schema whenever you close the NHibernate ISession object (since ActiveRecord uses NHibernate behind the scenes this poses a problem to us).

So, assuming you have setup ActiveRecord using an InPlaceConfiguratonSource similar to this:

IDictionary<string, string> properties = new Dictionary<string, string>();
properties.Add("connection.driver_class", "NHibernate.Driver.SQLite20Driver");
properties.Add("dialect", "NHibernate.Dialect.SQLiteDialect");
properties.Add("connection.provider",                "NHibernate.Connection.DriverConnectionProvider");
properties.Add("connection.connection_string", "Data Source=:memory:;Version=3;New=True;");
properties.Add("show_sql", "true");
properties.Add("proxyfactory.factory_class",                "NHibernate.ByteCode.Castle.ProxyFactoryFactory, NHibernate.ByteCode.Castle");

var source = new InPlaceConfigurationSource(); source.Add(typeof (ActiveRecordBase), properties);

ActiveRecordStarter.Initialize(source, typeof (Member).Assembly.GetTypes()); ActiveRecordStarter.CreateSchema();

You will not be able to run any queries against it because there is no schema present. In fact the code will consistently blow up with a SQLiteException stating “no such table: ….”. Unfortunately it’s not really possible to change the SessionFactory implementation here because that code is inside ActiveRecord.

Thank god I found this handy guide that suggested subclassing the DriverConnectionProvider class to replace the CloseConnection call with a fake like this:

public class SqLiteInMemoryTestingConnectionProvider : NHibernate.Connection.DriverConnectionProvider
{     public static System.Data.IDbConnection Connection = null;     public override System.Data.IDbConnection GetConnection()     {         if (Connection == null)             Connection = base.GetConnection();         return Connection;     }     public override void CloseConnection(System.Data.IDbConnection conn)     {     }
}

I then had to pass that new ConnectionProvider into NH through the configuration and all was well:

properties.Add("connection.provider",                "ImagineClub.Tests.SqLiteInMemoryTestingConnectionProvider, ImagineClub.Tests");

Only catch is, this doing the AR Initialization is painfully slow so I wrote a baseclass for my xUnit tests that makes sure AR Init is only run once and that the ActiveRecordStarter.CreateSchema() is run before every test (xUnit runs the testclass constructor before each test):

The final implementation for all my tests looks like this:

public class ActiveRecordInMemoryTestBase
{     public ActiveRecordInMemoryTestBase()     {         if (!ActiveRecordStarter.IsInitialized)             Initialize();         ActiveRecordStarter.CreateSchema();     }     private static void Initialize()     {         IDictionary<string, string> properties = new Dictionary<string, string>();         properties.Add("connection.driver_class", "NHibernate.Driver.SQLite20Driver");         properties.Add("dialect", "NHibernate.Dialect.SQLiteDialect");         properties.Add("connection.provider",                        "ImagineClub.Tests.SqLiteInMemoryTestingConnectionProvider, ImagineClub.Tests");         properties.Add("connection.connection_string", "Data Source=:memory:;Version=3;New=True;");         properties.Add("show_sql", "true");         properties.Add("proxyfactory.factory_class",                        "NHibernate.ByteCode.Castle.ProxyFactoryFactory, NHibernate.ByteCode.Castle");         var source = new InPlaceConfigurationSource();         source.Add(typeof (ActiveRecordBase), properties);         ActiveRecordStarter.Initialize(source, typeof (Member).Assembly.GetTypes());         ActiveRecordStarter.CreateSchema();     }
}

public class SqLiteInMemoryTestingConnectionProvider : NHibernate.Connection.DriverConnectionProvider {     public static System.Data.IDbConnection Connection = null;     public override System.Data.IDbConnection GetConnection()     {         if (Connection == null)             Connection = base.GetConnection();         return Connection;     }     public override void CloseConnection(System.Data.IDbConnection conn)     {     } }

Caution: If you copy/paste the above make sure to change the namespace and assemblyname for your SqLiteInMemoryTestingConnectionProvider to match yours.

So a database dependant unit test would look like this:

public class DatabaseTest : ActiveRecordInMemoryTestBase
{     [Fact]     public void DatabaseIsEmpty()     {         Assert.Equal(0, Member.FindAll().Length);     }
}

Initial runs are quite slow due to the AR Init, but the whole test-suite should run quite fast since only the schema creation is run before each test.

Read more →

Making simple things hard: NVelocity

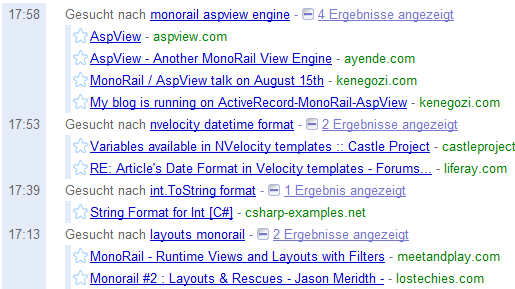
I was pretty done with the world after spending almost 2 days with xhtml/css coding for the new iC-Website. Turns out the programming gods want to teach me a lesson. Look at my Google Search log:

image

What you see here is me spending almost 45 minutes on formatting a date!

I need to take the date and split it into 3 parts so I can stick it into the following markup:

<div class="date">
    <span class="day">$day</span><span class="month">$month</span>
    <hr />
    <span class="year">$year</span>
</div>

I thought, hey that should be really simple, just call DateTime.ToString() and all will be well. And because it was so obvious I tried to create a macro to keep my viewcode clean. The result was:

#macro ( dateBox $currentDate )
#set ($day = $currentDate.Day.ToString("00") )
#set ($month = $currentDate.Month.ToString("00") )
#set ($year = $currentDate.ToString("yy") )
<div class="date">
    <span class="day">$day</span><span class="month">$month</span>
    <hr />
    <span class="year">$year</span>
</div>
#end

I still have no explanation why passing a DateTime into the macro isn’t working. Maybe because calling macros in NV isn’t the same as calling a CLR method. So I had to abandon the macro idea and just code it the way it is.

Now what really pissed me off to the point where I almost considered using ASPView as a view engine was that I spent almost 45 minutes with this for one simple reason: NVelocity won’t report errors as long as they don’t break the parser.

Perfect example:

$DateTime.Now.Format("dd MM yyyy")

Will just result in a “$DateTime.Now.Format("dd MM yyyy")” output, for no apparent reason other than the fact that there is no Format() method on the DateTime. Clearly my bad, I’m stupid and far too dependent on IntelliSense, but if NV isn’t telling me how I screwed up it’s really hard to find the mistake. Especially without syntax highlighting and intellisense DateTime.Format(…) looks perfectly reasonable at first.

Finally I ended up with this:

#set ($day = $currentDate.ToString("dd") )
#set ($month = $currentDate.ToString("MM") )
#set ($year = $currentDate.ToString("yy") )
<div class="date">
    <span class="day">$day</span><span class="month">$month</span>
    <hr />
    <span class="year">$year</span>
</div>

Read more →

Mixing static strings with NVelocity variables

In an ongoing effort to get into NVelocity while programming the iC-Website I wanted to concatenate a filename with the current loop count variable:

<img src="/Content/images/dummy$velocityCount.png" alt="post-image" />

This isn’t working. You’ll end up with dummy$velocityCount.png. While I’d like it to result in dummy1.png.


I suspected it could be solved somehow by using our beloved angle bracket to tell NV to explicitly evaluate my text:

<img src="/Content/images/dummy{$velocityCount}.png" alt="post-image" />

This will result is dummy{1}.png, why is beyond me but NV will parse it. Still this doesn’t really work so I found the solution on how to explicitly invoke NV evaluation in the NV users guide:

<img src="/Content/images/dummy${velocityCount}.png" alt="post-image" />

This is nothing really new, it’s all laid out in the NV users-guide, still especially the second case made me scratch my head for a moment.

Read more →

Using ELMAH Error logging with Castle MonoRail Rescues

On my last project I made ELMAH (the ever awesome ASP.NET error logging framework) work with ASP.NET MVC by modifying the routing logic a bit. It was quite simple since ASP.NET MVC throws HttpExceptions around quite liberally and you are frequently presented with a YSOD that then gets logged by ELMAH.

Using MonoRail the general routine of setting up ELMAH still applies (even simpler), but it’s customary to have a general rescue view that informs the user when something went wrong. Since the rescue concept in MR basically swallows Exceptions and prevents them from reaching ELMAH we need to serve them to ELMAH through ErrorSignaling.

Defining a rescue in MonoRail according to the tutorials looks like this:

[Rescue("generalError")]
public class DemoController : SmartDispatcherController
{
    [Rescue("indexError")]
    public void Index()
    {
        throw new DivideByZeroException();
    }
}

The string passed to the RescueAttribute identifies the name of the view to load within your Views\rescues\ folder if an exception occurs. This is bad for us because we can’t execute any code to signal ELMAH on the way to the view and within the view.

This is where the RescueController overload for RescueAttribute comes into play. You can define a whole controller that will handle exceptions and we can execute code there before rendering a view. To do so we just need to implement IRescueController and inherit from SmartDispatcherController:

[Layout("default")]
public class RescueController : SmartDispatcherController, IRescueController
{
    public void Rescue(Exception exception, IController controller, IControllerContext controllerContext)
    {
        ErrorSignal.FromCurrentContext().Raise(exception);
        RenderSharedView(Path.Combine("rescues", "generalerror"));
    }
}

We can use this new controller by changing the Rescue attribute:

[Rescue(typeof(RescueController))]
public void Index()
{
    throw new DivideByZeroException();
}

Now in case you want to have multiple error-pages (like one general and one telling the user he did something wrong) you could also define multiple rescue methods inside your RescueController and call each of those when needed:

[Rescue(typeof(RescueController))]
public class DemoController : SmartDispatcherController
{
    [Rescue(typeof(RescueController), "IndexRescue")]
    public void Index()
    {
        throw new DivideByZeroException();
    }

    public void List()     {         throw new NotImplementedException();     } }

If an exception was to occur in List() it would get handled by the Rescue method inside your RescueController, if Index throws MR will try to call a method called IndexRescue. And both can be logged by ELMAH.

Read more →

Pandora now likes concrete classes

While getting into WPF and the MVVM pattern (you should check out this Webcast by Jason Dolinger if you need a tutorial to get started on MVVM) I found myself somehow dealing more with concrete classes then I was used to. Usually I hide everything behind some interface and try to think really hard before violating that habit. Nonetheless, ViewModel classes are just that, ViewModel classes very special to their View and you really can’t hide them behind a meaningful Interface (without looking too silly).

So, after writing a fairly small application with only 3 ViewModel classes I found myself writing this utterly meaningless block of code:

container.Register(p =>
{
    p.Service<PersonViewModel>()
        .Implementor<PersonViewModel>();
    p.Service<AddressesViewModel>()
        .Implementor<AddressesViewModel>();
    p.Service<ProductViewModel>()
        .Implementor<ProductViewModel>();
});

It’s not completely meaningless after all, everything that keeps me from writing new PersonViewModel() somewhere in my code is just awesome. Only, it’s a bit too much of ceremony for something that simple. By asking for a concrete type you already tell Pandora everything it needs to know.

So, now Pandora can resolve concrete types directly if there is no registration that says otherwise. If you ask for a concrete class A, you’ll get a concrete class A even if the container is totally blank.
Now, if a class A is registered with the container it will use that one, if not Pandora will try to figure it out.

That also leaves open one way of extending your system. You can start off with an implicitly registered concrete class A, and if you want to subclass it later to modify behavior you only register the new subclass B as implementor for service A with Pandora and you’re set.

So, quick recap on how this works:

When a concrete type is requested and can’t be found in the configuration it will be instantiated if:

  1. It’s a concrete type
  2. You are not resolving to a name
  3. The dependencies of the requested type can be satisfied.

Also keep in mind that the default lifestyle for Pandora is singleton, so once you request A, you’ll always get the same instance back as long as you don’t change that through an explicit registration.

As always you can grab the source from the BitBucket site. There is no new binary release (I only moved up a minor version), but compiling Pandora is a pretty straightforward process as long as you have Visual Studio installed.

Ps: I was amazed how easy it was to implement this. Basically all I did was write a wrapper around the ComponentLookup service to implement the new functionality. It’s all in one place :).

Read more →

WebKit like focus indicator for WPF Windows

If you like Chrome/Safari or not, one thing that both have and all others lack is a good focus indicator that graphically shows me where my focus currently is. Jeff Atwood wrote something interesting on the topic of Where the Heck is My Focus:

But even if developers do remember to test for basic keyboard behavior, there's a deeper problem here. Keyboard navigation relies heavily on the focus. In order to move from one area to the next, you have to be able to reliably know where you are. Unfortunately, web browsers make it needlessly difficult to tell where the focus is.

I believe he not only has a valid point here, but also that his criticism this should not be limited to web browsers. Most if not all Windows applications do this thing badly, and it’s up to us developers to fix it.

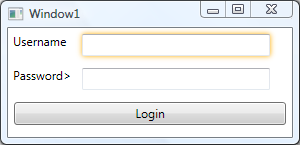
So, I decided to try to put my recent WPF research to good use and tried to implement a small class that applies/removes a WebKit like focus caret:

image

The whole implementation is completely encapsulated inside a class named WebkitFocusEffect that only needs to be initialized during your window construction:

public Window1()
{
    InitializeComponent();

    WebkitFocusEffect.Initialize(this); }

How does it work?

First of all, the source is available on BitBucket in my repository, so you can just go ahead and look at it. But I’ll also try to shed some light about what goes on there.

Routed Events

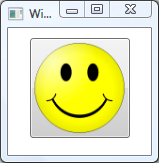
WPF introduced a cool concept called RoutedEvents, meaning that an Event like GotFocus/LostFocus will travel through the object model to the point where it gets handled and stops there. This technique is important because, unlike Windows Forms, WPF controls can contain other UIElements. This gives you far more control over the look and feel of your application, allowing for crazy things like a button with a image instead of text:

<Button Width="100">
    <Image Source="http://upload.wikimedia.org/wikipedia/commons/thumb/8/85/Smiley.svg/100px-Smiley.svg.png"></Image>
</Button>

Resulting in this:

image

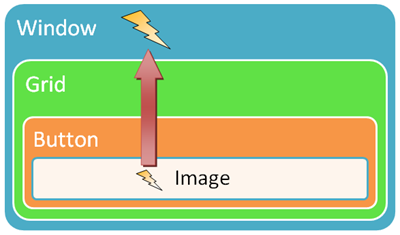
And that leads to the point of RoutedEvents: How do you know that the button was clicked? The event that was fired was the image’s click event, not the button. So, WPF introduced the concept of RoutedEvents that can traverse the object tree upwards and downwards. What means that the image’s ClickEvent gets passed on to it’s direct parent (our friend the button) to get handled there.

 image

If not handled at some level the event would travel up through the whole tree until reaching the root.

I used this technique to hook up the GotFocus/LostFocus events on our window (being the root element), relying on the fact that any GotFocus events by it’s children will bubble upwards the graph eventually reaching the window’s handler.

The handler then just unwraps the event’s source object (the source of the RoutedEvent gets passed along through the RoutedEventArgs parameter) and modifies it’s Effect property:

protected virtual void WindowGotFocus(object sender, RoutedEventArgs e)
{
    try
    {
        if (!(e.Source is UIElement)) return;

        var element = (UIElement) e.Source;         if (element.Effect == null)         {             var effect = new DropShadowEffect {Color = Colors.Gold, ShadowDepth = 0, BlurRadius = 8};             element.Effect = effect;             removeEffect = true;         }     }     catch (Exception ex)     {         Log(ex);     } }

One problem still remained: RoutedEvents can stop bubbling if they get handled at a lower level. This is how the button stops the image’s click event from spreading to it’s parent element, therefore containing it. So if you set an RoutedEventArgs.Handled property to true, it will stop bubbling up the tree:

private void LoginButton_GotFocus(object sender, RoutedEventArgs e)
{
    //This Event was handled and will not call Window's GotHandled eventhandler
    e.Handled = true;
}

Cool though is that RoutedEvents can’t really be stopped from bubbling, they do so anyway. Handled events just don’t invoke any event handlers up the tree any more, and that can be overridden explicitly when subscribing to the event:

window.AddHandler(UIElement.GotFocusEvent, new RoutedEventHandler(WindowGotFocus), true);

The last parameter is “handledEventsToo” and if set to true the event handler will be fired even if the event was already handled at a lower level. Allowing us to still do our thing while not getting in your way when subscribing to GotFocus / LostFocus events.

Effect

One little limitation is there though. Currently there is no EffectGroup container similar to the BitmapEffectGroup, and therefore only one effect can be applied to any UIElement at one time. So WebkitFocusEffect will just skip elements that already have a Effect defined.

I consciously went with the DropShadowEffect and not with the OuterGlowBitmapEffect because Effects are hardware accelerated (means they get processed by your idle graphics card instead of the CPU) and will not slow your application down as BitmapEffects would.

You can download the WebkitFocusEffect.cs through Bitbucket.

Read more →

Pandora release 0.1

I finally decided it’s time to release Pandora. The current build is stable and meets all of my current requirements, so I feel the best way to advance Pandora is to dogfood it on another project.

Also, this gives me a bit of an opportunity to catch up on the documentation side of things and work out bugs that may be there.

Upcoming features

I still have a pretty interesting wish list (Generics, Factory Methods, AutoConfiguration), but those features are all rather non-trivial and I feel Pandora should stay a simple and minimalistic container right now.

Where to get

You can download the compiled Pandora release from Bitbucket or you can grab the source and compile it for yourself.

Compiling Pandora

Just run the build.bat script and NAnt (supplied within the repository) will fire up and compile everything into the build\ directory. By default the script will also compile and run the accompanying unit tests, leaving you with a Pandora.Test-Result.htm file you can then review if you please.

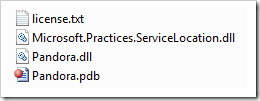
To compile without tests simply run “build compile”, and you’ll end up only with Pandora.dll/pdb and the common service locator library.

Using Pandora

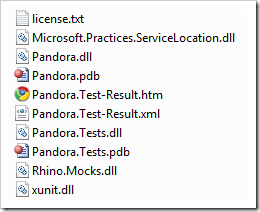
If you didn’t run build compile, you end up with lots of stuff in your build directory:

Pandora result

If you plan on using Pandora you only need the following:

image 

If you are interested in the ServiceLocation.dll you can read about it here: Common Service Locator Adapter for Pandora

Read more →